UDOO Neo Documentation
Bricks snap in sensors
Introduction
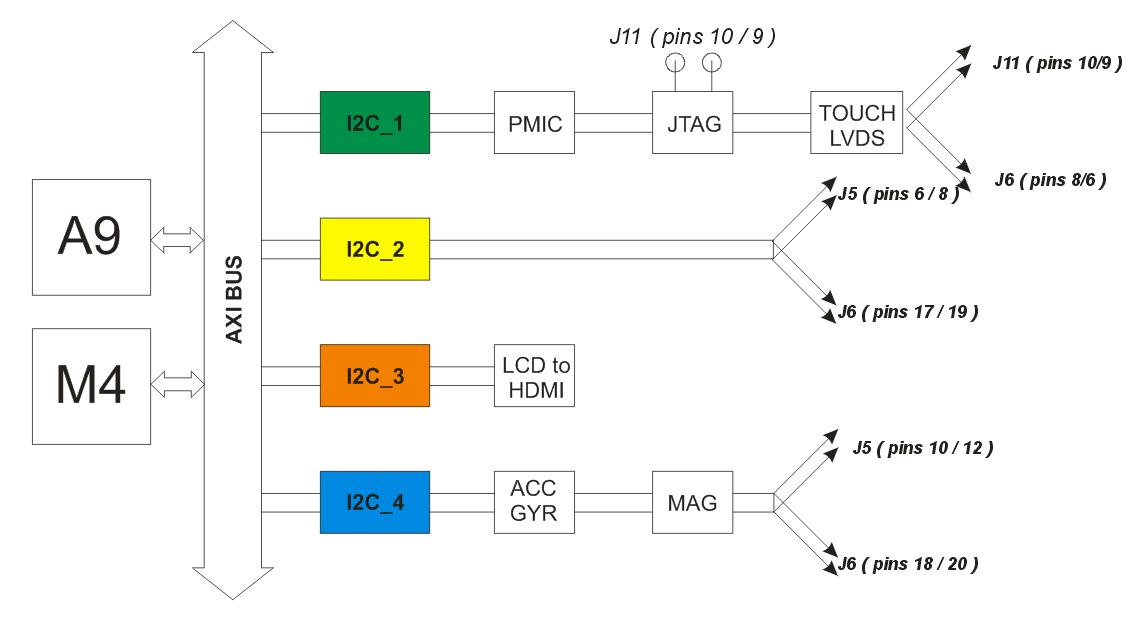
By default the the I2C-1 Bus connected to the Brick connector of UDOO NEO is assigned to Cortex-A9 core and it’s possible to control them by Linux driver. If you would use Bricks from the Arduino™ core Cortex-M4 take a look at Introduction to Pinmuxing.
Barometer Brick - MPL3115A2
Here you can find documentation as datasheet, schematics, and montage plane in the Other Resurces page of our website, in the Accessories tab.
Usage
Barometer Brick is able to return Temperature and Pressure ambient values.
In this file you can find the temperature scale (the sensor resolution):
/sys/class/i2c-dev/i2c-1/device/1-0060/iio\:device0/in_temp_scale
In this file you can find the temperature integer raw value (to be multiplied for the above-mentioned resolution):
/sys/class/i2c-dev/i2c-1/device/1-0060/iio\:device0/in_temp_raw
In this file you can find the pressure scale (the sensor resolution):
/sys/class/i2c-dev/i2c-1/device/1-0060/iio\:device0/in_pressure_scale
In this file you can find the pressure integer raw value (to be multiplied for the above-mentioned resolution):
/sys/class/i2c-dev/i2c-1/device/1-0060/iio\:device0/in_pressure_raw
Heads up! If you turn off the M4 the device name can change to
/sys/class/i2c-dev/i2c-1/device/1-0060/iio:device2
Barometer example
This example reads data from the Brick sensor and prints the temperature and pressure on the console:
#!/bin/bash

while [ 1 ]; do
    echo -n 'temp: '
    TEMP_RAW=`cat /sys/class/i2c-dev/i2c-1/device/1-0060/iio\:device0/in_temp_raw`
    TEMP_SCALE=`cat /sys/class/i2c-dev/i2c-1/device/1-0060/iio\:device0/in_temp_scale`
    python << EOF
print( $TEMP_RAW * $TEMP_SCALE )
EOF

    echo -n 'pressure: '
    PRES_RAW=`cat /sys/class/i2c-dev/i2c-1/device/1-0060/iio\:device0/in_pressure_raw`
    PRES_SCALE=`cat /sys/class/i2c-dev/i2c-1/device/1-0060/iio\:device0/in_pressure_scale`
    python << EOF
print( $PRES_RAW * $PRES_SCALE )
EOF
done
Linux kernel support
If you plan to use this Brick sensor with a custom kernel, be sure to build the following module:
Device Driver ->
    -> Industrial I/O support
            -> Pressure Sensors
                ->  Freescale MPL3115A2 pressure sensor Driver
And declare the sensor in the device-tree too:
&i2c2 {
    clock-frequency = <100000>;
    pinctrl-names = "default";
    pinctrl-0 = <&pinctrl_i2c2_1>;
    status = "okay";

    barometer: mpl3115@60 {
        compatible = "fsl,mpl3115";
        reg = <0x60>;
    };
};
Connection at boot
If the sensor is already connected at boot the kernel automatically recognizes the sensor. If you connect the sensor when UDOOBuntu already booted, you need to restart the module:
sudo rmmod mpl3115
sudo modprobe mpl3115
Temperature Brick - TMP75b
Here you can find documentation as datasheet, schematics, and montage plane in the Other Resurces page of our website, in the Accessories tab.
Usage
Enable the sensor via the following command:
sudo sh -c 'echo lm75 0x48 > /sys/class/i2c-dev/i2c-1/device/new_device'
(sudo sh -c is required to execute a command as root user)
In this file there is the temperature value in milli-degree Celsius:
/sys/class/i2c-dev/i2c-1/device/1-0048/temp1_input
Temperature example
This example reads data from the Brick sensor and prints the temperature on the console:
#!/bin/bash
while [ 1 ]; do
    cat /sys/class/i2c-dev/i2c-1/device/1-0048/temp1_input
done
Linux kernel support
If you plan to use this Brick sensor with a custom kernel, be sure to build the following module:
Device Drivers  --->
Hardware Monitoring support  --->
        <M>   National Semiconductor LM75 and compatibles
And declare the sensor in the device-tree too:
&i2c2 {
    clock-frequency = <100000>;
    pinctrl-names = "default";
    pinctrl-0 = <&pinctrl_i2c2_1>;
    status = "okay";

    lm75: lm75@48 {    // Brick Temperature Sensor
  		compatible = "national,lm75";
  		reg = <0x48>;
  	};
};
Connection at boot
If the sensor is already connected at boot the kernel automatically recognizes the sensor. If you connect the sensor when UDOOBuntu already booted, you need to restart the module:
sudo rmmod lm75
sudo modprobe lm75
I2C Snap-in connector for UDOO Bricks